Distinguishing moles from melanoma using Jasmine
Downloading some data
Download this set of images of skin lesions: half of them are of skin cancers, malignant melanoma to be precise; the other half are moles, which are common and not related to cancer.
Extract the zip-file to a folder on your computer. From a general inspection you'll probably notice that the melanomas have rough edges, and often have uneven colourings, the moles are generally quite smooth and round, with more even colouring. These are two of the criteria that medics use to identify whether a lesion requires further investigation. We'll use Jasmine to create a vision system that can locate and classify these lesions automatically.
Creating a project and adding images
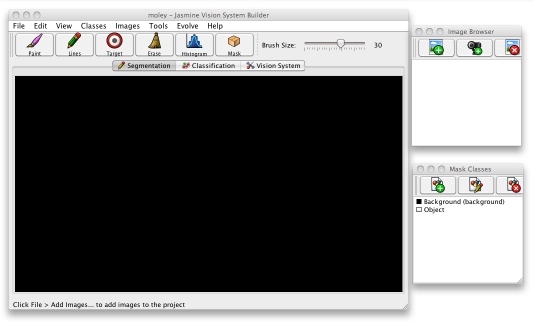
Extract the image set to the directory of your choice, then start Jasmine. This will bring up the main Jasmine window.
Select File>New Project and choose a name for your project and the directory to which you have downloaded and extracted all the training images, then click OK. A pair of other, smaller windows will appear, as shown below. One of these, labelled Image Browser, is concerned with the images that form your training data and the other, Mask Classes, with the classes that you want to detect and distinguish.
Click File>Save Project As to save your project to disk so you can access it again later. When you do, it will be available in from the Recent Projects menu.
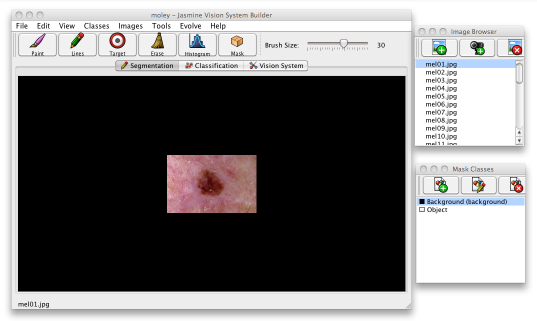
Select File>Add Images... or click the leftmost button at the top of the image browser window; this will bring up a dialogue. Use it to select all the images you want to use for training, one at a time, and click the Add Images button, then click Done to close the dialogue. All the images are now added to your project and can be accessed from the image browser. Click on any image to have it appear in the main window.
It is common practice to partition datasets such as these into two parts, one used for training and the other for testing. The dataset contains some 19 images of melanoma and 13 of moles, so let us use only the first five images of each category for training and reserve the remainder for testing how well the evolved solution works.
Segmentation
The first step is to generate a program which recognises different parts of the image according to their colour and texture — if we can train it to tell the difference between normal skin and a lesion, we can use it to locate where they are in an image. Make sure the Segmentation tab in the user interface is selected. Then select one of the images you have added to the project. To do the segmentation, you first need to create two classes, one for the background and the other for the lesions. Since this is a common step, you'll see in the mask classes window that the two classes have already been created for you.
Select one of the classes and start to "paint" a class overlay onto mel01.jpg using the drawing tools. You can draw in free mode (paint) or draw lines — select the tool you want using the buttons on the toolbar to choose which mode to paint with. The slider on the toolbar allows you to choose the brush size, and the scroll wheel can be used to zoom in or out of the image. You'll want to paint the lesions in as "objects" and the background as "background" — see below.
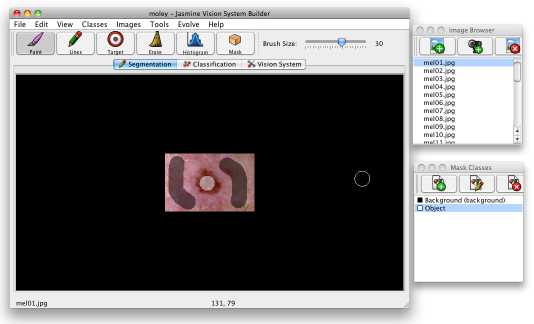
You can use the eraser to clear any overlays that you make by mistake; while in paint mode you can simply right click to start erasing. You shouldn't need to paint the whole image; simply choose a few representative regions and paint there. Try not to paint too close to the edges of the lesions as you may create inconsistent training data — it's best to let the software find the edges itself.
When you're happy with your handiwork, select File>Save Mask to save the mask — masks are saved in separate files in the project folder, making it easier to transfer them between projects. You should repeat the painting of background and lesion for all five training images of melanomas and moles.
While you're painting, you might want to look at the statistics for each class, to ensure that one class doesn't have many more training instances than another. Select Tools>Class Statistics... to open up a dialogue that shows you the relative occurences of each class. Each time you save the overlay the dialogue will update itself, or you can click the Refresh button to update it.
Evolving the segmenter
Having generated suitable training data, you can now use Jasmine to evolve a segmenter. Before you do this, you may want to do some feature selection: select the menu item Tools>Feature Selection/Extraction and press the Evaluate button on the toolbar. This pops up another box (which can appear under other windows, depending on your operating system and window manager, so be careful). This will select (by default) the 20 most useful features, according to the feature selection metric defined in a drop-down box. The default is linear discriminant analysis, although you can choose others. You can see the score associated with each feature, and whether it is enabled or disabled — see below.
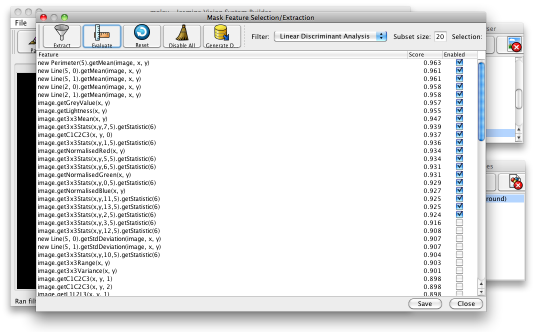
The features you have selected will be used by the GP engine to evolve programs that perform the segmentation. When finished, click the Save button at the bottom then close the feature selection dialogue.
Click Evolve>Background Subtractor to open the wizard that generates the program for you. Follow the steps in the wizard, although by default you don't have to do anything, then click Finish to have the GP process start straight away. If you're familiar with Genetic Programming, you may tick the advanced settings box to change some of the GP settings.
As GP learning process starts, a dialogue will appear to show its status. The error is shown in a graph in the left side of the window (hopefully the error line on the graph should go down as time goes by) and the best program evolved so far is displayed on the right as Java code. Along the bottom, the status line lets you know how many mistakes and hits that program made on the data, the program's size and other information. For imaging problems, the interface will also give you a preview of how the program performs on one of your training images. When the GP process finishes, your display should like the following image.
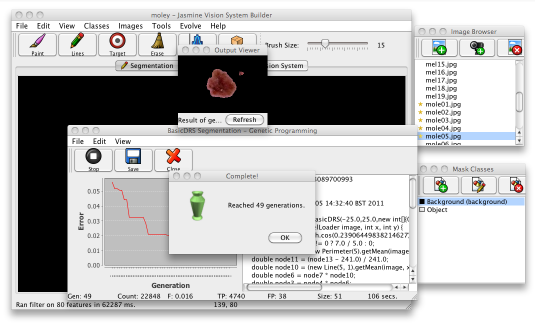
At this point, you should click the Save button on the toolbar to save the solution to disk. Once it is saved you can then deploy it wherever you want. Click the close button to hide the GP dialogue. If the solution isn't as good as you'd like, you can close the GP window and add or remove some training data and try again; usually it takes a few attempts before your program performs well enough. If possible, choose a solution which produces a tidy boundary around the lesions, without too much noise.
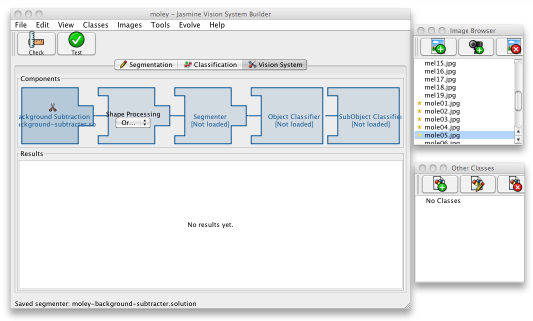
When you have evolved and saved a decent segmenter, click the third, Vision System, tab in the main Jasmine window. You should see the processing stages of your vision system laid out, though empty. To start creating the system, click on the Background Subtraction component at the left; a file open dialogue will be launched. Select the program you just saved, then click the Check button on the toolbar to make sure that it can be loaded correctly. This may give you the option to compile the program into pure Java code, which will offer a 20-30% performance boost; to do this, you must have a Java Development Kit installed on your computer — it may be difficult to use this feature if you've launched Jasmine from your browser. After that, use the Test button to re-evaluate it and get an idea of its accuracy on the training data.
Once you've done this, your vision pipeline will look as shown below, and the project is now ready for the second stage.
Classification
The second stage in your vision system is to decide whether or not a region identified by the segmenter is a melanoma or just a normal mole. This decision will be made according to the shape, colour and texture of a lesion: Jasmine calculates a number of features, such as how many corners a lesion has, how rough it is, how much like a circle it is, and so on. We shall need a second evolved program to make the decision for us.
To train this second program, you'll need to make another set of training data. Click on the Classification tab on the main Jasmine window. You'll first need to create two more classes, and you do this by selecting Classes>Add Class... from the menu. Create two classes, one called mole and the other called melanoma, with whatever colours you want. Make sure that neither has the background box ticked. Save the project.
Now you've done this, press the Segment button in the top left of the main Jasmine window: this will run the segmenter you evolved on the current image. Once it has done this, part of the image should have a border drawn around it, indicating that it is now an object. Choose the appropriate class in the mask class window and click inside the border. This will assign it the class, which will appear as a label above the object, as shown below.
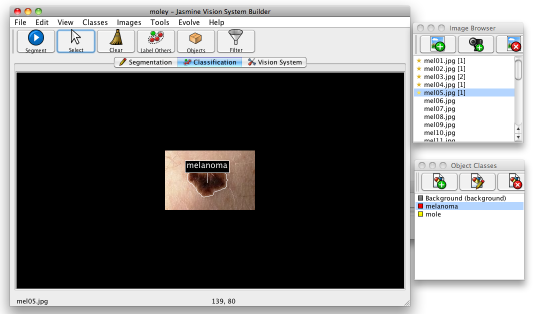
You can right-click on the same object to remove the class label. You can click on other objects in the image or simply ignore them. You can do this on as many images as you like — the number of objects assigned to each image appears as a number in square brackets in the image browser window; that is also visible in the image above. If you click Tools>Class Statistics, it will tell you how much training data you have in total. For this tutorial, you should indicate the class of the lesions in all of the images you used for training the segmenter, i.e., five mole and five melanoma images.
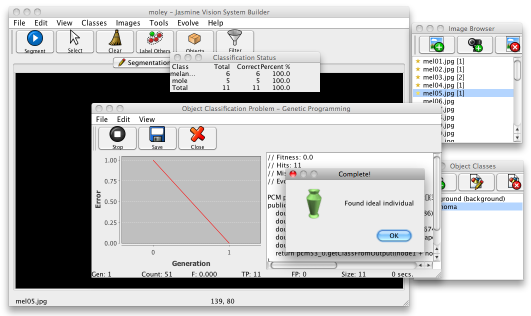
You're now ready to evolve the second, classification stage. Select Evolve>Object Classifier, then choose No from the dialogue box that pops up. In the next dialogue box, choose Basic Dynamic Range Selection from the list and click the Finish button. This time the dialogue will display a small table with the classification accuracies for each class, as shown below.
When you're happy with the result, save the solution to disk and Close the window. Then go to the Vision System tab and load it up, this time filling in the object classifier box. Your project should now be ready to locate and classify your images. Save the project.
To test how well your evolved vision system performs, select one of the unseen images (i.e., one of those you avoided during training) in the image browser window, then select Tools>Test Vision System to run the complete pipeline on that image. If you notice any mistakes you can to go back and improve the training data, re-train the segmentation or classification stage, and re-evaluate.